Closing the Cockpit and the Fore Deck


A couple of hours here. A couple of hours there. Not much to look at but then suddenly there is a big change to the appearance of the boat. Progress is definitely being made!
After the hull was assembled and the resin set I went back to see how the deck pieces fit. The cockpit floorboard wasn't quite matching the upper edges of the hull, and the wooden bulkhead wasn't exactly meeting the edges of the hull, either. In fact, the starboard side of the hull at the floorboard was nearly 1/4 inch too far outboard, and the port side was about 4mm too far inboard. I hate it when that happens.
The solution was to take a hacksaw blade to the foam bulkhead near the starboard side and cut a long, thin 1/4 inch thick wedge from it, and insert a 4mm wedge on the port side of the same bulkhead. The application of some epoxy resin later on to these points could be done if I felt like it, but it really isn't necessary except to possibly stop squeaking when the hull flexes.
I had to do the port side on only one bulkhead, but three of the starboard bulkheads needed adjustment.
Since the floorboard didn't mate flush with the wooden bulkhead I sanded the edge that was too long until it fit reasonably well.
The next part to assemble was the fore deck.
Looking at the remaining panels I was still amused that there were three side panels for the fore deck when only two were needed. It is nice to have a spare, I guess.
The top center panel was designed to not quite fill the gap between the two side panels. According to Rick this was intentional as it is difficult to determine how it would fit given the thickness of the plywood and how it would fit after the pieces were beveled to mate. I don't know about that. It could easily have been 3 or four inches longer with no problems.
I took some fresh 80 grit sandpaper, made from the belt of my now-broken belt sander, and with the sanding block beveled the edges of the fore deck pieces. It didn't take much time at all. The sanding belt was quite durable and the grit stayed pretty sharp.
While checking the fit of the fore deck I found that keeping the pieces in place was a bit trying. The section of the hull between the 5m bulkhead and the bow needed to be spread a little at the top in order for the pieces to fit. So, another foam bulkhead was cut to fit at 5.5m.
With the new bulkhead things fit much better. Still, the top deck piece just would stay in place supported only by one edge. Something would need to be done to support it when the assembly phase commenced.
After some additional consideration I decided that the compartment just ahead of the wooden bulkhead and the one just behind where the stuffing box exits the hull would be ideal for storage compartments. They would serve double duty as access points for draining the hull should it leak. So, to make sure that water inside the various compartments could actually make it to these compartments I punched small holes at the bottoms of the foam bulkheads. By tipping the boat bow or stern up water could be directed to the compartments with the access hatches and removed.

Tonight I took a rectangular piece of scrap foam and traced the upper part of the wooden bulkhead on it. After cutting out the bulkhead shape I now had a cradle in which I placed the deck pieces upside down. Again, the markings in the wood were helpful in making sure the pieces were aligned properly.
Duct tape was used to hold the pieces together along the their curves, and to secure the top deck piece in place between the two side deck panels. Tape was also used to cover the gap between the end of the top piece and the side panels, as I intended to fill this area with fillet material.
With the panels mounted I measured and cut some 6 ounce cloth to cover the seams almost all the way to the bow.
All was ready for the next assembly phase.
I measured and mixed about 2/3 of a coffee cup of resin. It was spread thinly over the underside of the cockpit floorboard, the fore edge and the interior side edges where the floorboard enters the hull. The cuts in the bulkheads received some resin and their tops as well, along with the top edges of the hull. The floorboard was put in place and clamps and weights applied.
Fillet material was mixed and applied to the top and bottom interior side edges of the floorboard to as to provide some support below the seat area.
The deck panels were lifted from the cradle and placed flat on the bench. This allowed resin to be applied to the beveled edges as well as the interior surface. Once this was done the panels were placed back on the cradle and the pieces checked to make sure they were fitting properly together.
Fillet material was now applied to the interior seams and squeegeed smooth. The glass cloth was applied and the remaining resin was used to wet out the cloth. I had to mix up another small batch of resin as there wasn't quite enough of the old stuff left and it was beginning to set anyway.


While that was slowly setting I applied the remaining fillet material to the seam between the wooden bulkhead and floorboard, and to the vertical interior seam of the bow.
The remaining resin was applied to the edges of the hull from the wooden bulkhead to the bow, and to the edges of the deck currently sitting in the cradle.
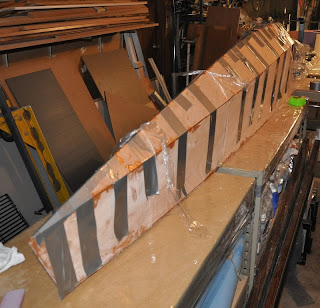
Gently removing the deck from the cradle I set it in place on the hull and began tying it in place with shrink wrap plastic strips. This wasn't quite doing the job as gaps appeared in all the wrong places!
Grabbing a roll of duct tape I strapped the deck to the hull every couple of inches on both sides. This seemed to do the trick, and the pieces fit pretty well together.
There were a couple of sections of the hull that wanted to fit 2 or 3 mm inside the deck, however. Taking a thin piece of metal and using it to pry the hull outward did the trick and duct tape helped secure that as well.
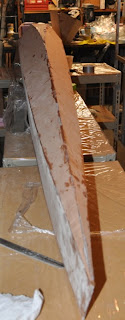
I let this set overnight and upon returning from my day job I removed the weights and tape. Here are the results:


1 Comments:
It's coming together quite nicely. Looks like you'll soon have the fastest HPB on the Sound. Thanks for all the great blog posts.
Post a Comment
<< Home