A New Year and Work Begins
Since the last posting I had a few more races (Budd Inlet being the last official one) and participated in a prototype race on Lake Washington called "Length of the Lake", abbreviated LOL. In that race, held on Thanksgiving weekend, the conditions were a bit too rough and a recent modification made to the prop strut mount contributed to my need for a rescue by the Harbor Patrol and a trip to the Harborview ER to quickly restore my body temperature.
So... the winglets and the displacement provided by the floats at a 3 foot distance on either side of the V15-6M were not adequate in the face of a 25+ knot wind and 3+ foot waves to keep the boat from capsizing. The rudders were also inadequate in such conditions to keep the boat pointed where I wanted to go. The modification to the prop strut mount prevented the strut from being locked in the fully extended position, which caused the propeller to frequently hit the protective plate mounted on the bottom of the hull as the waves tossed the boat about. Lastly, the Speedplay Frog pedals, while very good at having but a single moving part (the pedal body about the axle), make for a painful pedaling experience if one happens to lose their bike sandals in a mishap - as I did.
The easiest thing to fix was the problem with the propeller hitting the hull. It turned out that a quarter turn of the clamp screw fixing the tension cable to the strut was all that was needed to enable the strut securing pin to slide into place. If only I had noticed this before the race started it would have been a fix I could have made on the calm water at the beginning of the event.
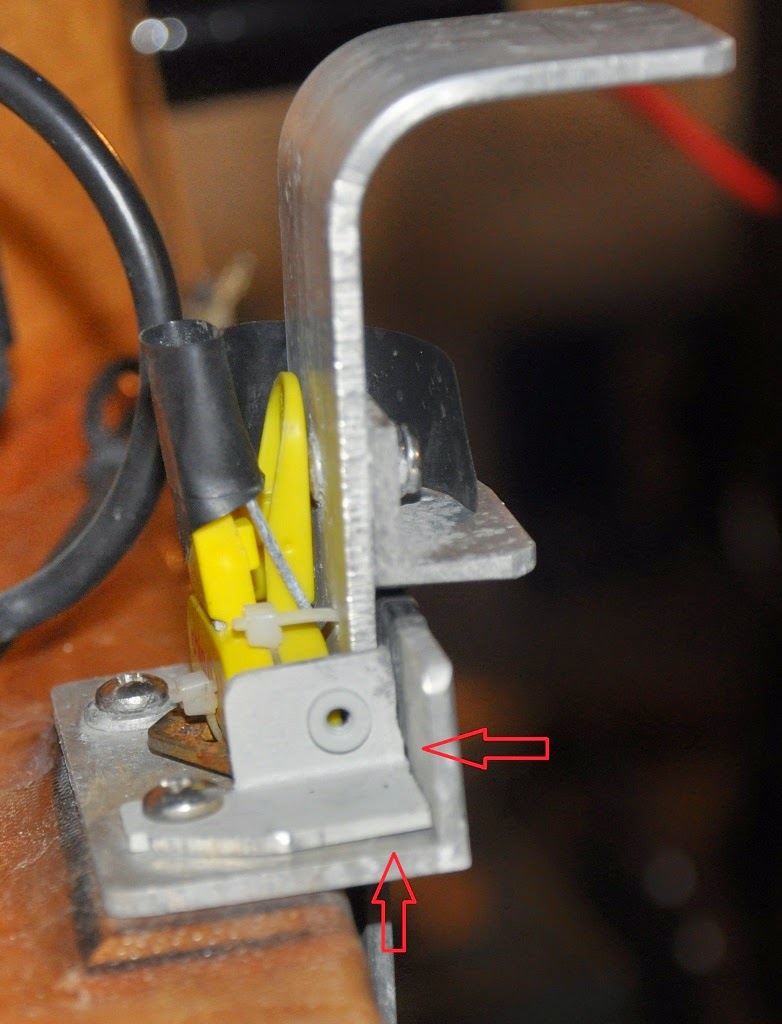 |
| Blunt limiter |
 |
| Green arrow shows limiter. Red arrow shows where strut was being worn away by strut mount edge. |
 |
| Underside of platform pedal |
 |
| Platform pedal. T-nuts will be encased with resin or Shoe Goo. |
Instead, I decided to go to Home Depot and pick up a 2 foot by 8 foot by 2 inch Styrofoam insulation sheet and have them cut it lengthwise into four equal width pieces. The total cost was about $25.
Taking the pieces home I discovered that they will fit inside my Toyota Matrix, so I'm happy to not have to bind them to a rooftop carrier. Yay!
 |
| Old float on top of sanded new float blanks. |
The next step is to glue the pieces into pairs, followed by tracing the lines of the old floats onto the new ones, stretching out the middle. I'm thinking of not tapering the stern sections, or at least not tapering them very much. This would increase their displacement from what would otherwise be about 25% more volume to nearly 75% more. Also, with the weight of the old floats in the 5.5 pound range and the new floats currently at about 2 pounds, there is a reasonable budget for the exterior layer of glass, resin and mounting tubes.
I'm planning on using the same method of mounting the floats as before; i.e., using the same fiberglass tubes and mount behind the seat back. This will enable me to use the same akas. In addition, the grab tubes will be used for a forward set of mounts. I still have a pair of somewhat shorter fiberglass tubes previously used as akas that will work in this position. This should provide a fairly stiff mount for the floats and allow for quick assembly and disassembly.
The last issue, i.e., the rudder, will have to wait. I have some ideas for a kick-up style of rudder used in kayaking that may work reasonably well, but nothing concrete at this moment.
posted by Michael Lampi @ 3:21 PM
0 comments
![]()

0 Comments:
Post a Comment
<< Home